How to photograph miniatures on the cheap

A mid-80s' Grenadier cleric photographed using this method.

A mid-80s’ Grenadier cleric photographed using this method.

When posting your miniatures online, whether on blogs, forums or facebook it is nice to have good photographs of them. This is more or less the cheapest way possible to take good photographs on the cheap. This is what I do when I photograph painted miniatures.

You will need:

  • A window, preferably facing north. A northern window will provide a soft even light. If the sun is shining in through the window it will create sharp shadows. Any direction will do however if it is an overcast day or there is no direct sunlight coming through the window.
  • A camera. Preferably a good one with a nice lens, but any cheap compact or even a cellphone will do in a pinch.
  • A white paper, the larger the better. In this case I used an A3 printer paper. The paper will function both as a backdrop to get a clean background and as a reflector to create a soft and even light for the miniature.
  • A couple of boxes or books. Preferably 1980’s miniature boxes or books by post modern thinkers. I have found that Foucault is especially suited for this use.
  • A table to put next to the window. It is good if the table is roughly as high or higher as the bottom of the window.

The method is quite simple. Just stack the boxes or books. Put the paper against the boxes to form a backdrop facing the window. The idea is to avoid creasing the paper, so no shadows or lines are formed in the backdrop. The paper will slide, I just use the weight of the miniatures I am photographing to hold the paper in place.
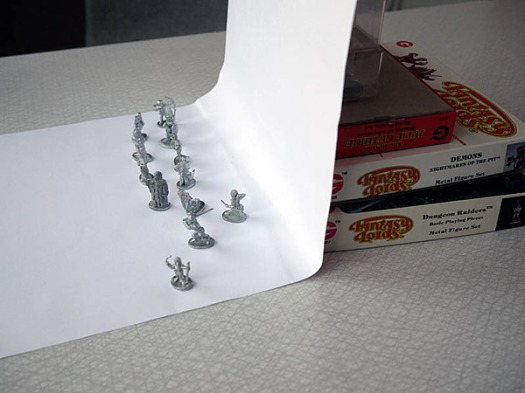
The setup in all its glory!

The setup in all its glory! The paper was slightly creased forming the slight line seen in the photo of the cleric in the top of the post.

When everything is set up, just to put the camera on the table between the window and the miniatures and take some photos. You can use the paper to set the white balance of the camera. I use photoshop to correct the colours and contrast. But there are plenty of free and easy to use software for editing images. An image browser with some editing functions like Picasa or Iphoto works just fine.

Julie Guthries’ Women of adventure box set

JG_lada

FIREBALL!

More than ten years ago I bought a bunch of miniatures on a closing sale of a webshop belonging to some game store in southern Sweden. This was before easy to use freeware webshops, so there was just a single line of text with the title of the product. It must have been very cheap because I bought a lot of stuff.

One thing I got was several box sets with RPG miniatures from the long defunct Grenadier Models. I recently pulled them out from the bottom of my pile of gaming stuff and thought I should write a couple of lines about them. First out is the Julie Guthries’ Women of Adventure Box Set! This box was released in 1992, and is a collection of minatures sculpted in the mid to late 80’s

For all of you who haven’t heard about her, Julie Guthrie is truly a veteran sculptor in the miniatures industry. She is probably best known for all the RPG miniatures she has sculpted for Grenadier, Ral Partha and  currently Reaper Miniatures.

As you can see in the top of the post the box art features a very 80’s looking sorceress who is just about to blast you with a fireball while looking fabolous, in the background a female fighter is charging forward to chop your charred remains in to little pieces. It also proclaims  proudly that it contains a limited edition miniature.

boxinsert

The box insert shows that the woman on the cover is a black sorceress. All the other archetypical are also represented.

women

No, I could not resist to start priming and painting until after I photographed them.

The sculpts are very nice even though they are bit dated. They are very finely detailed and well proportioned even though the heads are a bit big and round. The women are quite reasonably dressed and armed unlike a lot of miniatures you see. More importantly though, they are not posing for a pin-up photo shoot, which if most miniature lines are to believed are quite a common occurence in fantasy worlds.

rogue

So far I have only painted the rogue. I painted 80% of this miniaure ten years ago, let it sit in a box until finished up the details a couple of weeks ago. Hopefully I’ll get more done soon.

Finally, for all of you who haven’t heard about her, Julie Guthrie is truly a veteran sculptor in the miniatures industry. She is probably best known for all the RPG miniatures she has sculpted for Grenadier, Ral Partha and currently Reaper Miniatures.

Further Reading:

If you want to read up more on Grenadier the wikpedia page has a lot of info.

The excellent Oldhammer on a budget blog has post about Grenadier models as well as several links to manufacturers that produce some of Grenadiers old range. Unfortunately I have not been able to find anyone who manufacturers who has Julie Guthries old sculpts. So ebay is probably your best bet.

Reaper Miniatures has a lot current (and some very good) sculpts from Julie Guthrie.

Dirt Cheap: Em4 plastic orcs

I have bunch of really cheap miniatures in my collection. So for all of you that come across these cheap minis while surfing the web and wonder if miniatures that cheap really are worth your time and money I am starting a series of reviews called “Dirt Cheap”.

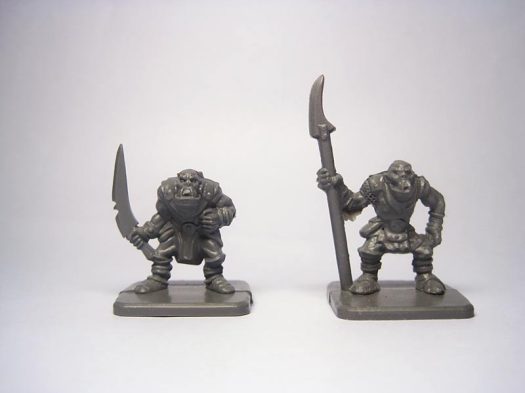
I am starting with the cheapest of the cheap. Em-4’s fantasy plastics. The range consists of six different miniatures, three orcs and three dwarves. They are sold in bags of 50 for £7.7 (!), which works out at rougly £0.16 per miniature! They can also be bought loose for £0.21 per miniature. As you can see this is mindboggingly cheap, and when I put in an order for some other stuff I couldn’t resist adding a few to my order.

First a bit of background on these minis. They were first released in 1990 as a part of the Fantasy Warriors box set, a game produced by Grenadier Models. They seem to have been sculpted by Mark Copplestone but imitating the style of Nick Lund.

orcs_unpainted

As you can see from the pictures they are produced in a grey plastic and unlike other plastic miniatures they do not come on a sprue.

The orcs have one of the classic old school monopose poses, the weapon to the side and the hand close to the hip. Not very three dimensional, but very much standard for the time they were released, so no problem there.

The details are very soft, and these miniatures are not very detailed to begin with.

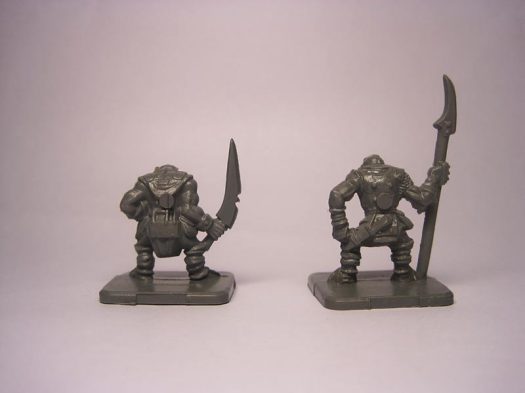
orcs_unpainted_back

On the back of the miniatures, there are these weird round pegs sticking out. This is probably where the plastic was injected. These were quite easy to remove though if you are a reasonably experienced hobbyist since the plastic is quite soft and easy to cut.

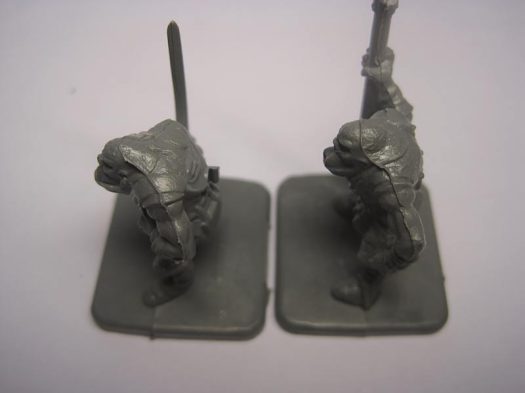
orcs_mouldllines

The mouldlines are very heavy, but since these guys doesn’t really have any fine details, removing them was easy.

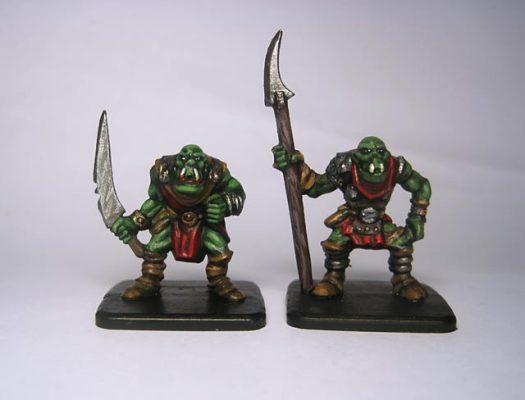
orcs-painted

After a quick paintjob they do look quite good. The swordsman also turned out to have slightly better defined details in the face. Things like is hard to notice until you paint the miniature. I do like the look on the face of the left one.

It is hard to review miniatures that are as cheap as these because you are not expecting anything from them. Compared to other plastic miniatures from the early 90’s these orcs look fine. And that is probably the only standard you can hold them against without being unfair.  At this price, it is hard to say anything else than that they are anything but good value. But if you expect to them to be anything like a modern plastic miniature, you will be disappointed.

I don’t see myself getting more of these. They need some work to look good, and I simply don’t have the need for loads of cheap plastic old school orcs. But if you do, they are indeed very cheap, and EM4 is a very nice company with excellent service.

Links and further reading:

They can be bought from: http://em4miniatures.com/. A company that also sell a lot of very nice ex-Grenadier metal miniatures at very good prices.

In this thread at the Lead Adventure Forum, there is a very impressive project, where an entire army of orcs are made from EM4-plastics. Three monopose orcs into 147 unique ones!


Tutorial: Mould line removal from Mantic’s PVC (restic) miniatures.

Mantic’s PVC miniatures (called restic, premium plastic or sprueless plastic by mantic) has gotten a reputation for being hard to work with. I feel that this is not entirely fair and might have something to do with the material being relatively new compared with metal and injection plastic. This is how I do to remove mould lines.

Tools of the trade.

Tools of the trade.

What you need is a sharp hobby knife, and a wire brush. They are often sold in kits of three, one steel, one brass and one nylon. The nylon and the brass one is the ones used for this purpose.

scraping

My hands have a really weird colour in this photo. This is what happens when you photograph under fluorescent light.

First of all I use a sharp scalpel to scrape and cut away the mould lines. This goes against common internet wisdom that says that you only can cut it away. I mostly scrape because it is easier and I find that it gives me better control. For some places on a miniature cutting is easier, but in maybe 80% of the time I scrape. Using a file seems to work quite well also, but i prefer scraping with a knife over filing for everything except some parts of metal miniatures. But more on that later.

fuzz

This doesn’t look that good does it? It is hard to photograph but there is plastic fuzz and a some burr along the removed mould line.

brush

To help with the fuzz we bring in the wire brush! I usually start with the nylon, if that isn’t enough I use the brass one.

finishedarms

And now the fuzz is gone! The brass wire brush is hard enough to remove the fuzz and burr, but soft enough not to damage the details.

Filing then? I decided to try it out on a miniature to see how well it works.

judwanmouldlines

The miniature used in this example is Mee’kel Judwan, a MVP from Dreadball. As you can see the mould lines are very visible. In the folds of the cloak it could be quite hard to remove the mould lines with a scalpel. Here a file is suitable to use.

filing

I use cheap needle/jewelers files from a hardware store. They are a alot cheaper than the stuff you buy in the hobby shop, and are the basically the same.

fuzzyjudwan

As you can see the fuzz and burr is even worse when you use a file.

judwanafterbrush

After a quick go with the brushes the fuzz and burr is mostly gone, It seems however that you need to brush more after using the files than scraping with a scalpel.

Saving The Panther Lancers Part 2: First attempt!

This is the first result of my Panther Lancer rescue attempt.

IMG_2640_blog IMG_2641_blog IMG_2644blog

I am pretty happy with the result, but I will try to make the arms better proportioned in the next one. I will also see if I can do anything about the big hands. The shield comes from E-M4 miniatures where you can buy a bag of 50 mixed shields for £1.02!

I will probably explain more thoroughly in a later post how the conversion was done.

Saving the Panther Lancers Part 1: Review and parts breakdown

pantrar

Image from manticgames.com.

In my 2013 Mantic crazybox I got six Basilean Panter Lancers, and thus they became the most awkward miniatures in my collection. They are a odd bunch, some parts are well sculpted, others not. Some parts are well proportioned, others way off. It almost as if the parts were made separately and then added up to make the model. There are also some design choices I don’t agree with, but this is a separate issue from the problems with execution of the design. I will come back to both as I go through the parts of the miniature.

The plan is to try and “save” these miniatures, making them look good without completely remaking them.

sistersbodies

Looking just at these they seem fine. Questionable cup size though.

sisters_heads The heads are a mixed bag. the faces are ok. Top left, is that a braid or an anaconda. Hooded ones boring. The necks are way to long, the heads doesn’t fit on the bodies. sisters_armsI really don’t know what is going on with does forearms, did they use Photoshop Disasters as an anatomy reference while sculpting? The hands are also very big. I also don’t like how the the left arm is empty, it think it is supposed to look like it is holding reins, but it just looks odd.sisters_saddleSaddles, wont use these. Looks heavy and awkward for riders that are supposed to look light and nimble. The feet wont even rest properly in the weird platform stirrups.sisters_cats

The panthers are ok, but the leaping one is a bit questionable in a unit.

So to sum it up, this is what needs to be done.

  • Shorten neck, fit.
  • Shorten forearms.
  • Reposition arms so the pose is better.
  • Sculpt some kind of more reasonable saddle.
  • Add a shield or something to the left arm.

This might sound negative, but they are cheap if you get them from Mantic and it will probably be fun to fix them.

Forge Father Stormrage Veterans – Thoughts and Review

Mantic probably knew what they were doing when they invented the Forge Fathers. 20 years after Games Workshop removed the Squats from 40k, there seem to be a lot of people out there who want them back even though they were a bit silly, and certainly (at least how they were depicted) wouldn’t fit in with 40k’s over the top grimness.

Mantic seem to be a lot more tolerant to humour in their Warpath sci-fi setting, even though neither their Orx (space orks) nor their Forge Fathers (space dwarfs) act as comic relief. With their strategy of staying close, but not too close, to many of the concepts found in Games Workshop’s games, The Forge Fathers is a smart move. Forge Fathers is at least a much better name than squats.

In the yearly Mantic Crazy box (basically a once a year deal where you get a lot of random Mantic miniatures for little money) I got in January there was a squad of Forge Father Stormrage Veterans. Which supposedly are some of the toughest guys in the Forge Father armies.

allofthem

There is five miniatures in the pack, all in Mantic’s “Plastic Resin”, which to my understanding is just some kind of PVC. They come with the option to equip the lead with either a big sledgehammer or a pointing finger. I chose the hammer. Obviously.

stormveteranleader

This is the leader of the crew. The guy who is either pointing or wielding a big hammer. I wonder if anyone actually assembles him without the hammer? Anyhow, he is a charming little fellow. The arms are maybe a bit long though.

stormveteran1

This guy is wielding a heat cannon. This was also the only that was a bit more challenging to put together since the fuel line didn’t want to match up exactly. I think that there is something slightly off with how he is holding the weapon though, holding it eith tht arm that extended makes it seems quite light weight. Nitpicking aside, it is not a bad miniature.

stormveteran2

This is my favorite of the bunch, simply because of the beady eye lenses. Giving some Forge Fathers helmets with face masks was a good decision by Mantic. It makes them a lot more mysterious and therefore more interesting. The Forge Fathers without masks are a lot more boring. The way he holds his weapon is also the weakness with this miniature, the side grip combined with the round magazine makes it look a bit awkward. The weapon is also a bit to long to fit with the compact forge fathers.

All in all I do like these miniatures, they have a lot of character and are of good technical quality. After reading lots of horror stories and complaints about the material I was pleasantly surprised with the ease they came together and how easy they were to clean. Mantic’s miniatures are often very likeable and they are a likeable company. However, I often get the feeling that the design would benefit of another round of concept design. This is also the case with these guys.

Seeds!

FRÖN_BLOGG

Seeds are one of those things that are a bit to fun to buy. A package of seeds is inexpensive, there is a HUGE variety and the shipping is usually cheap. In that sense they are a bit like wargaming miniatures… No wonder that it is easy to end up with loads of them.

Anyhow, this is the latest order of some of the stuff we are growing this year.

So it begins.

plantat

Today I planted my first seeds for the season, and today I make the first post on this blog. This blog will be about my attempts at urban gardening (it can’t hardly be called farming…) and my addiction to little plastic and metal men.

So what did I plant today? Chili. Early Jalapeño and red pepper to be precise. The red pepper and the Early Jalapeño are sorts I tried out with great success last summer. They grew well and gave a good harvest on my window sill. Since I live in northern Sweden and we have a risk for frost until april, these won’t be placed outdoors. I also took some seeds from a Jalapeño bought at the supermarket. The fruit was a bit green, so I don’t know if these seeds will give anything, but I figured it was worth a try.

We have also started planning for what we will plant in pots and buckets on the balcony. A post will follow with what we have planned.

The Geek part of the title then? It will come! I have a review of a 3d-printed board game, a post on my attempt to salvage the Basilean cat riding nuns from Mantic’s Kings Of War, and a recipe for bread to go with Twilight Imperium sessions on its way!